Development Setup
Backend Development
Note
LedFx now uses aubio-ledfx which is hosted in pypi with full wheels, therefore it is no longer necessary to build from source. This removes many risks, and makes the LedFx development experience far simpler.
Common Steps
Install python version 3.10 through 3.13. 3.12 is the current preferred python release for general development.
Note
Python 3.13 is supported, but Hue lights integration will currently not be functional due to mbedtls dependency.
Python versions outside this range (e.g., 3.14+) are explicitly unsupported and may cause non-deterministic failures.
Install git.
Install uv
We suggest using the standalone installer to make updates easier while uv is rapidly changing
Clone the main branch from the LedFx Github repository:
$ git clone https://github.com/LedFx/LedFx.git
Using uv, create a virtual environment, install all dependencies, and launch ledfx:
$ cd LedFx
$ uv run ledfx
uv can be used to launch ledfx at any time against the established venv.
Windows Specific Steps
Note
Do not install python from the Windows Store - it will not work with these instructions.
Note
It is no longer necessary to install Build Tools for Visual Studio!
Enable audio loopback which is default for a user install, but needs a manual step for dev builds, by calling once
$ uv run ledfx-loopback-install
Linux Specific Steps {#linux-dev}
Note
This assumes an apt based system such as ubuntu. If your system uses another package manager you should be able use it to get the required packages.
Install system dependencies via
apt install:$ sudo apt install libatlas3-base \ portaudio19-dev \ pulseaudio \ cmake
The libavformat dependancy either need the specific lib according to your OS and release version or just install ffmpeg
$ apt-cache search libavformat
Look for the relevant lib of the format libavformatXX, for example
libavformat60 - FFmpeg library with (de)muxers for multimedia containers - runtime files
Install that specific generation
$ sudo apt install libavformatXX
macOS Specific Steps {#macos-dev}
No additional steps required.
Local pytest
There are a collection of system level tests run as a test clamp around the rest api’s.
These are run as part of the CI actions when raising a PR and must run clean green before a PR is merged.
To run these local and / or develop more tests
Ensure you have local loopback installed, or you may hit failures once audio effects are under test
$ uv run ledfx-loopback-install
launch the suite of tests with uv which will ensure dependencies are installed
$ uv run pytest -vv
Frontend Development
The LedFx frontend is now maintained in a separate repository: LedFx-Frontend-v2.
Building the LedFx frontend is different from how the core backend is built. The frontend is based on React.js and thus uses yarn as the core package management.
Note
The following instructions assume you have already followed the steps above to install the LedFx dev environment and have the backend running. If you have not done so, please do so before continuing.
Note
LedFx will need to be running in development mode for everything to
work. To enable development mode, open the config.json file in the
.ledfx folder and set dev_mode: true
Frontend Development Options
You have two options for frontend development:
Option 1: Separate Clone (Recommended for frontend-only development)
Clone the frontend repository independently and run it against your local backend:
$ git clone https://github.com/YeonV/LedFx-Frontend-v2.git
$ cd LedFx-Frontend-v2
$ yarn install
$ yarn start
The frontend dev server will proxy API requests to your local LedFx backend at runtime.
Option 2: Submodule (For integrated development)
If you need to work on both frontend and backend together, initialize the git submodule:
$ git submodule update --init --recursive
Or if you already have the repository cloned, pull the submodule:
$ git pull --recurse-submodules
Windows
1. Install Node.js and yarn:
First, you need to install Node.js. You can download it from Node.js official website. After installing Node.js, you can install yarn via npm (which is installed with Node.js).
$ npm install -g yarn
2. Navigate to the frontend directory and install the dependencies:
$ cd frontend
$ yarn install
3. Start LedFx in developer mode and start the yarn watcher:
$ uv run ledfx
$ yarn start
At this point, any changes you make to the frontend will be recompiled, and after a browser refresh, LedFx will pick up the new files. After development and testing, you will need to run a full build to generate the appropriate distribution files prior to submitting any changes.
4. When you are finished with your changes, build the frontend:
$ yarn build
Linux
1. Install Node.js:
Node.js is a prerequisite for yarn. You can install it using your distribution’s package manager. For Ubuntu, you can use the following commands:
$ sudo apt-get update
$ sudo apt-get install nodejs
2. Install yarn:
$ npm install -g yarn
3. Navigate to the frontend directory and install the dependencies:
$ cd frontend
$ yarn install
The easiest way to test and validate your changes is to run a watcher that will automatically rebuild as you save and then just leave LedFx running in a separate command window.
4. Start LedFx in development mode and start the watcher:
$ uv run ledfx
$ yarn start
At that point any change you make to the frontend will be recompiled and after a browser refresh LedFx will pick up the new files. After development and testing you will need to run a full build to generate the appropriate distribution files prior to submitting any changes.
5. When you are finished with your changes, build the frontend:
$ yarn build
macOS {#macos-frontend}
1. Install nodejs and yarn requirements using homebrew:
$ brew install nodejs
$ brew install yarn
$ cd ~/frontend
$ yarn install
2. Start LedFx in developer mode and start the yarn watcher:
$ uv run ledfx
$ yarn start
3. When you are finished with your changes, build the frontend:
$ yarn build
Document Development
See the Documents Development for more information.
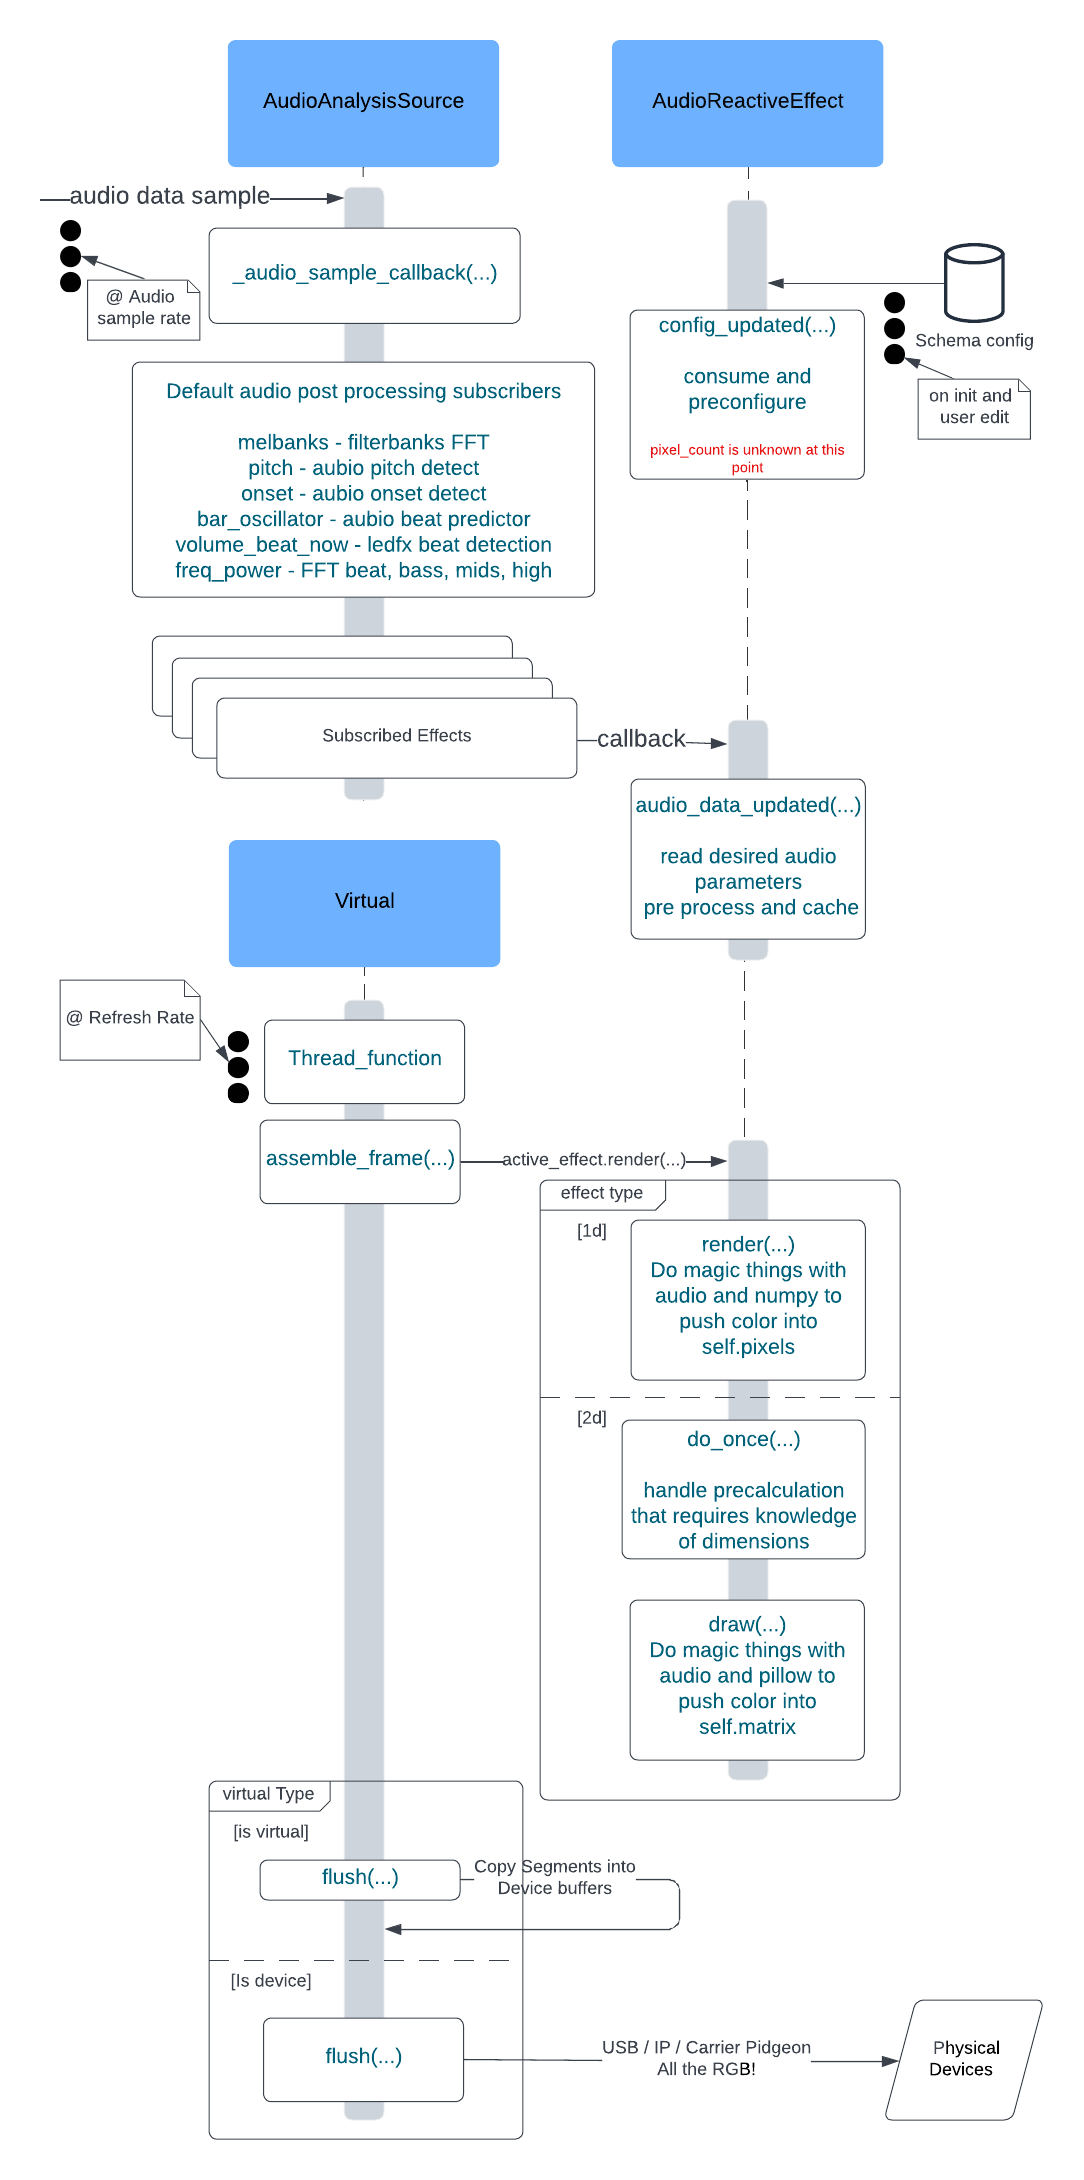
How it works
Well enough for discussional purposes. This diagram specifically illustrates audio reactive effects, temporal are similar but have their own thread loop independant of audio framing.
Useful Tools
VSCode extensions
For backend development, vscode is the IDE of choice.
There are many extensions that are of use to developers, including but not limited to
Github Copilot
Github Pull Requests
autoDocsting
GitLens
Prettier
Pylance
Python
Python Debugger
Tasks
Teleplot
Tasks
A simple extension to run tasks from the vscode taskbar at the bottom of the window.
Currently only the Build and Open Docs task is exposed. This task will install dependancies, build the docs and open in your browser, all with a single click!

Teleplot
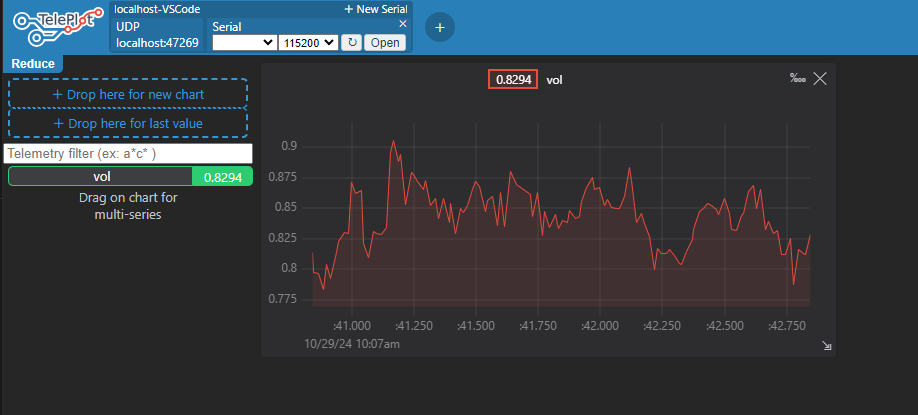
Teleplot is a great tool for visualizing data in real time, that can be the graphing equivalent of print()
It is used during development to quickly graph, and then thrown away, do not submit teleplot code to the main branch.
General documentation along with rich examples is at Teleplot Github
A helper Class has been added to the LedFx codebase to make it easier to use, and is available at ledfx/utils.py
simply import the class and use it as follows
from ledfx.utils import Teleplot

Teleplot.send(f"my_var_name:{my_var_value}")
Teleplot built-ins
There are two Teleplot use cases built into LedFx
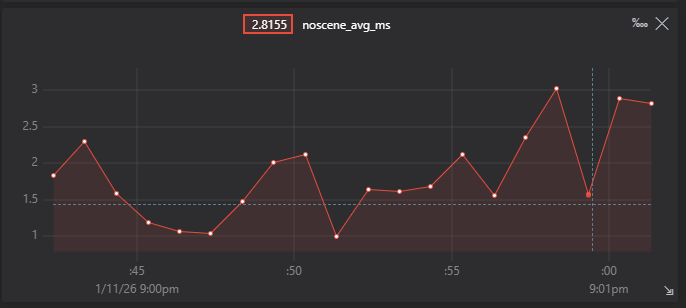
Any effect with Advanced / Diag enabled, which generates the Logging and front end diagnostic dialog for frame render performance will also generate a Teleplot graph with a naming convention of <virtual_id>_avg_ms. So it is easy to track render performance through time, with a method that is default off for all users.
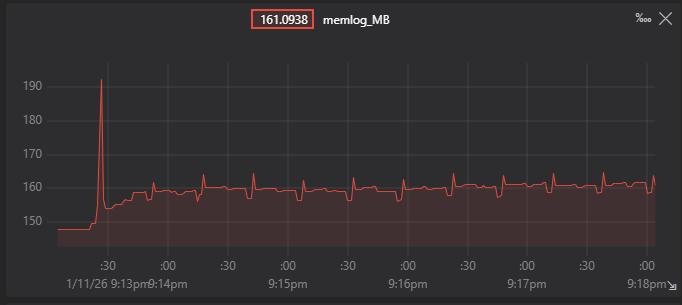
The Pixels effect additionally has a unique Teleplot enabled under the same switch to generate a graph of real-time physical RAM usage in total by LedFx in MB.
This is done via a call to process.memory_info().rss
RSS (Resident Set Size) - the portion of the process’s memory that is held in physical RAM.
It includes:
Code/text segment - the compiled program code Heap - dynamically allocated memory (numpy arrays, effect objects, etc.) Stack - function call stacks and local variables Shared libraries - loaded into memory (numpy, PIL, etc.)
It can be used to monitor for memory leaks at runtime under aggressive testing.
Here is such a graph running the 2d Hammer playlist from the test config, hammer_test.json
It is expected that memory use spike on asset load, then will grow but stabilise under such conditions.
It is easy to see even slow leaks by running for large time periods under pressure test, and has been used to resolve all apparent under playlist 1d and 2d exhaustive testing.
The Teleplot naming convention will be <virtual_id>_MB